Products for USB Sensing and Control Canada flag
Products for USB Sensing and Control

sales inquiries

quotes, distributor information, purchase orders
sales@phidgets.com

technical inquiries

support, advice, warranty, returns, misshipment
support@phidgets.com

website inquiries

corrections or suggestions
web@phidgets.com

Address

Unit 1 - 6115 4 St SE
Calgary AB  T2H 2H9
Canada

PHIDGETS Inc.

Unit 1 - 6115 4 St SE
Calgary AB  T2H 2H9
Canada
+1 403 282-7335

DC Motor Phidget

ID: DCC1000_0

Control one high-current brushed DC motor with this powerful Phidget. Has an encoder input and analog input for feedback control.

$75.00

Quantity Available: 575

Qty Price
5 $71.25
10 $67.50
25 $60.00
50 $52.50
100 $48.75
250 $45.00
500 $41.25
1000 $37.50
50+...

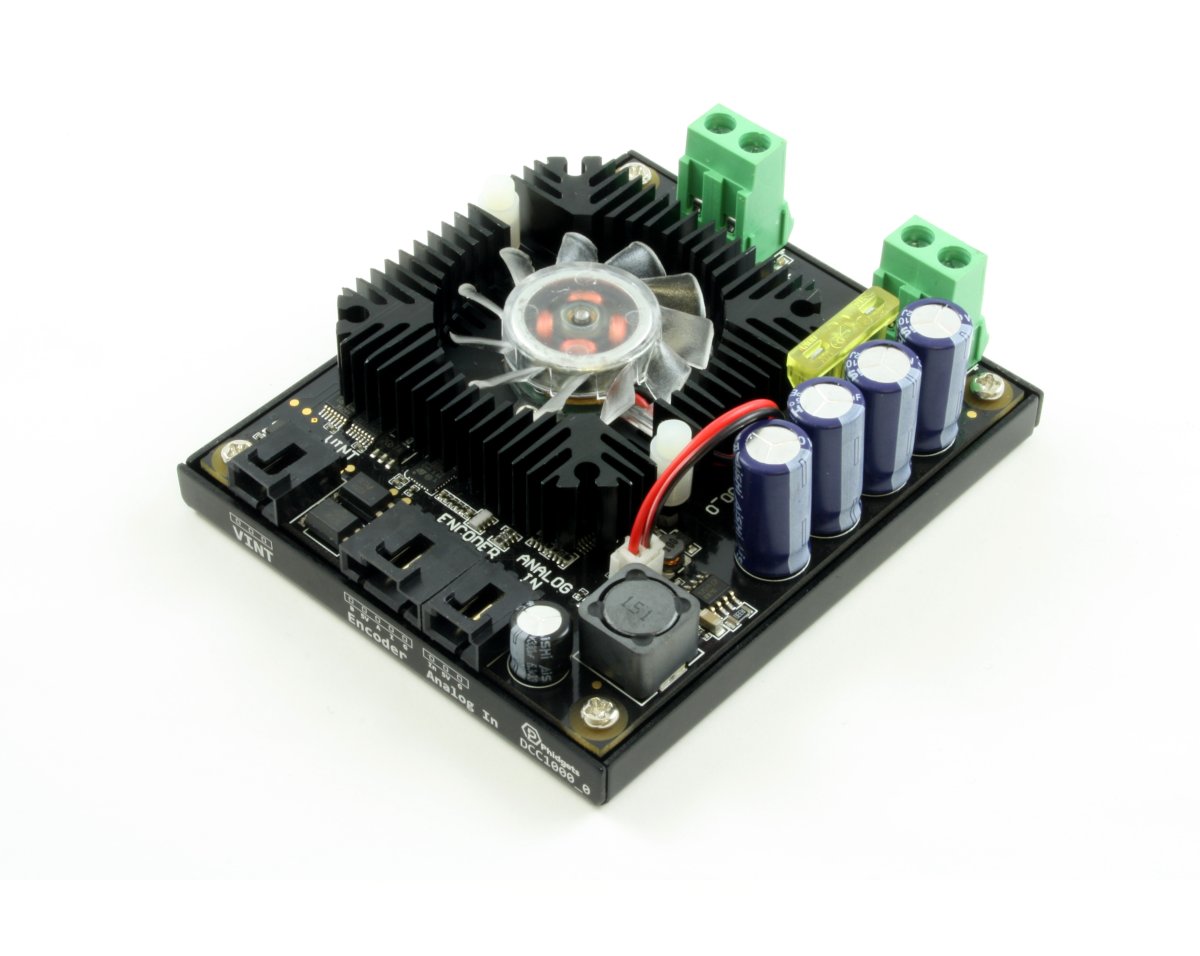
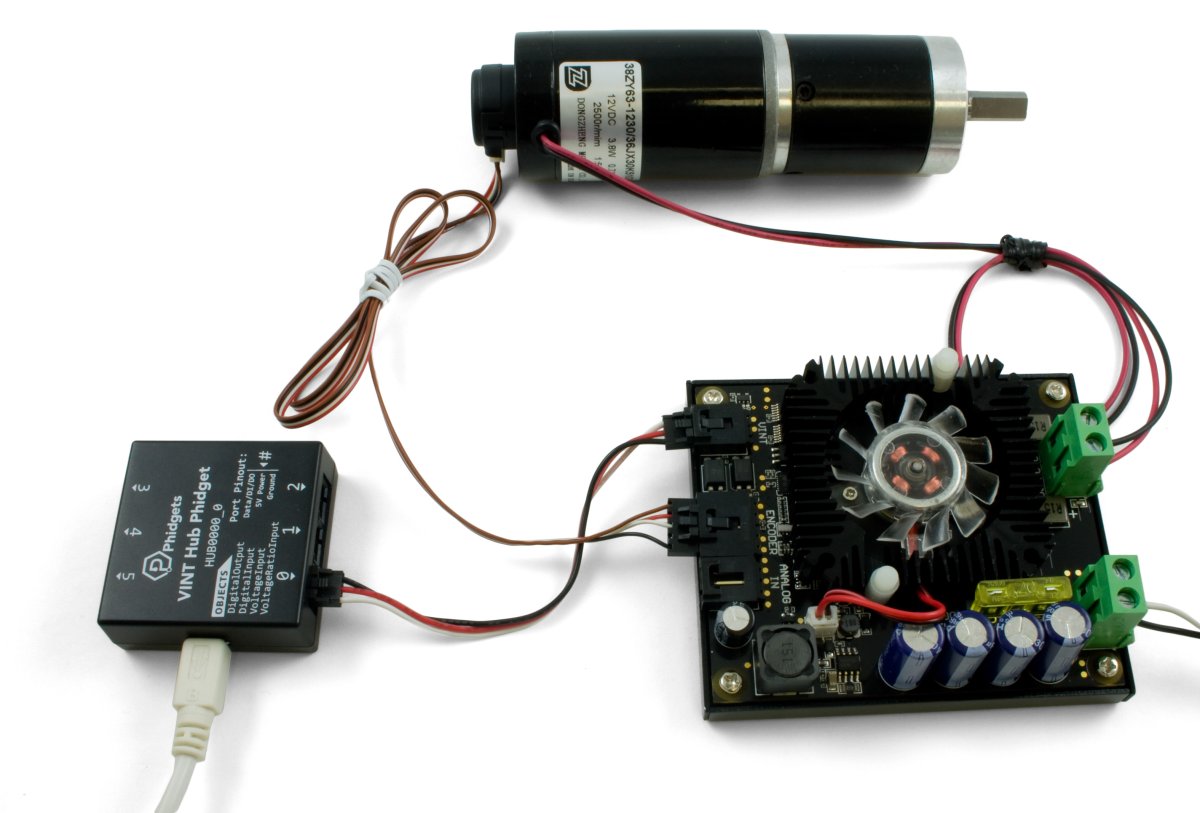
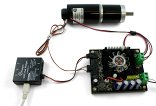
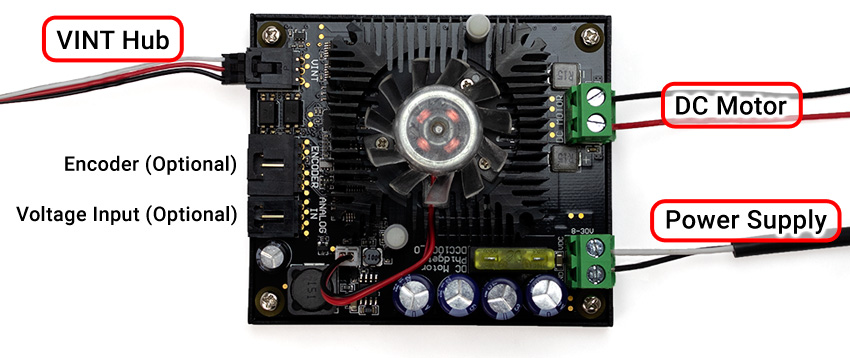
The DC Motor Phidget allows you to control a single DC motor (up to 25 A) or DC linear actuator. It uses high-frequency pulse-width modulation to achieve smooth operation. This Phidget connects to your computer through a VINT Hub and is isolated for improved reliability.

The board is designed with a number of safety features- polarity protection in case power is plugged in backwards, overcurrent protection in case of back-EMF spikes, and a settable Failsafe mode, which can turn off the controller if it loses communication with your program.

Features

  • Control velocity and acceleration to drive forward or reverse
  • Potentiometer input for position feedback without the need for a separate input board
  • Input for the encoder attached to the shaft of your motor, giving you position control
  • Built-in temperature and current sensors so you can react to motor stalls or overheating
  • Failsafe Protection can be enabled to turn off the device if your program becomes unresponsive

Videos

Guides

VINT Hubs

This Phidget is a smart device that must be controlled by a VINT Hub. For more information about VINT, have a look at the VINT Overview page. You can use a Phidget Cable to simply and easily connect the two devices. Here's a list of all of the different VINT Hubs currently available:

Product Board Properties
Part Number Price Number of VINT Ports VINT Communication Speed Max Controlled By
HUB0002_0
VINT Hub Phidget
$40.00 6 1 Mbit/s USB (Mini-USB)
HUB0007_0
1-Port VINT Hub Phidget
$24.00 1 1 Mbit/s USB (USB-A)
HUB0001_0
VINT Hub Phidget
$35.00 6 1 Mbit/s USB (Mini-USB)
HUB0000_1
VINT Hub Phidget
$30.00 6 100 kbit/s USB (Mini-USB)
HUB5000_0
Wireless VINT Hub
$60.00 6 100 kbit/s Local Network (Ethernet or Wi-Fi)
SBC3003_0
PhidgetSBC4
$120.00 6 100 kbit/s

Phidget Cables

Use a Phidget cable to connect this device to the hub. You can solder multiple cables together in order to make even longer Phidget cables, but you should be aware of the effects of having long wires in your system.

Product Physical Properties
Part Number Price Cable Length
3003_0
Phidget Cable 10cm
$1.50 100 mm
CBL4104_0
Phidget Cable 30cm
$1.75 300 mm
3002_0
Phidget Cable 60cm
$2.00 600 mm
CBL4105_0
Phidget Cable 90cm
$2.00 900 mm
3038_0
Phidget Cable 120cm
$2.25 1.2 m
CBL4106_0
Phidget Cable 150cm
$2.50 1.5 m
3039_0
Phidget Cable 180cm
$2.75 1.8 m
3004_0
Phidget Cable 350cm
$3.00 3.5 m
KIT4030_0
Phidget Cable Kit
$10.00 80 mm

Power Guards

Using motor controllers with large motors can pose a risk for your power supply. If your supply does not have protective features built-in, you can use a Power Guard Phidget to prevent damage from power spikes from back EMF that is generated when motors brake or change direction. We recommend that you use the SAF2000 for any motor with a current rating between 1 and 5 amperes, and the SAF1000 for motors above 5A.

Product
Part Number Price
SAF2000_0
Power Guard Phidget
$10.00
SAF1000_0
Programmable Power Guard Phidget
$40.00

DC Motors

We offer a wide variety of DC motors that can be used with this Phidget. Motors with higher gearbox ratios will have higher torque at the cost of lower speed. If you want a motor that has an encoder attached to it, skip ahead to the next table.

Product Motor Properties Physical Properties Gearbox Specifications
Part Number Price Rated Speed Rated Torque Shaft Diameter Weight Gear Ratio Gearbox Type
3261_0
12V/0.2Kg-cm/1080RPM 3.7:1 DC Gear Motor
$18.00 1080 RPM 240 g·cm 6 mm 144 g 3 1217 : 1 Planetary
3254_0
12V/0.2Kg-cm/230RPM 10:1 DC Gear Motor
$10.00 230 RPM 200 g·cm 6 mm 128 g 10 : 1 Spur
3262_1
12V/0.9Kg-cm/285RPM 14:1 DC Gear Motor
$18.00 285 RPM 900 g·cm 6 mm 170 g 13 212289 : 1 Planetary
3255_0
12V/0.3Kg-cm/127RPM 18:1 DC Gear Motor
$10.00 127 RPM 310 g·cm 6 mm 133 g 18 : 1 Spur
3256_0
12V/0.8Kg-cm/46RPM 50:1 DC Gear Motor
$11.00 46 RPM 820 g·cm 6 mm 137 g 50 : 1 Spur
3263_1
12V/3.0Kg-cm/78RPM 51:1 DC Gear Motor
$20.50 78 RPM 3.1 kg·cm 6 mm 193 g 50 801895 : 1 Planetary
3257_0
12V/1.6Kg-cm/23RPM 100:1 DC Gear Motor
$11.00 23 RPM 1.6 kg·cm 6 mm 136 g 100 : 1 Spur
3265_0
12V/0.5Kg-cm/670RPM 3.7:1 DC Gear Motor
$38.00 670 RPM 540 g·cm 8 mm 416 g 3 1217 : 1 Planetary
3266_1
12V/1.9Kg-cm/175RPM 14:1 DC Gear Motor
$42.00 175 RPM 1.9 kg·cm 8 mm 464 g 13 212289 : 1 Planetary
3267_1
12V/6.6Kg-cm/49RPM 51:1 DC Gear Motor
$43.00 49 RPM 6.6 kg·cm 8 mm 526 g 50 801895 : 1 Planetary
3267_0
12V/6.6Kg-cm/49RPM 51:1 DC Gear Motor
$33.00 49 RPM 6.6 kg·cm 8 mm 526 g 50 801895 : 1 Planetary
3268_1
12V/17.3Kg-cm/18RPM 139:1 DC Gear Motor
$43.00 18 RPM 17.3 kg·cm 8 mm 526 g * 139 1841221 : 1 Planetary
DCM4000_0
24V/2.5Kg-cm/3280RPM DC Motor
$40.00 3280 RPM 4 kg·cm 8 mm 1.4 kg
DCM4004_0
24V/4.3Kg-cm/3000RPM DC Motor
$50.00 2800 RPM 8.7 kg·cm 10 mm 2.7 kg
DCM4005_0
24V/6Kg-cm/3200RPM DC Motor
$60.00 2900 RPM 11.4 kg·cm 10 mm 3.3 kg
3269_3
24V/5.1Kg-cm/588RPM 4.25:1 DC Gear Motor
$69.00 588 RPM 4.4 kg·cm 12 mm 1.3 kg 4 14 : 1 Planetary
DCM4001_0
24V/10Kg-cm/772RPM/4.25:1 DC Gear Motor
$80.00 772 RPM 12.2 kg·cm 12 mm 1.9 kg 4 14 : 1 Planetary
3270_2
24V/14.2Kg-cm/192RPM 13:1 DC Gear Motor
$66.00 192 RPM 13.3 kg·cm 12 mm 1.5 kg 12 2425 : 1 Planetary
DCM4002_0
24V/45Kg-cm/182RPM/18:1 DC Gear Motor
$82.00 182 RPM 47 kg·cm 12 mm 2.1 kg 18 : 1 Planetary
3272_2
24V/50.9Kg-cm/53RPM 47:1 DC Gear Motor
$72.00 53 RPM 43.8 kg·cm 12 mm 1.7 kg 46 82125 : 1 Planetary
DCM4003_0
24V/162Kg-cm/50RPM/65:1 DC Gear Motor
$84.00 50 RPM 153 kg·cm 12 mm 2.2 kg 65 : 1 Planetary
3273_2
24V/82.6Kg-cm/33RPM 76:1 DC Gear Motor
$72.00 33 RPM 71.4 kg·cm 12 mm 1.7 kg 76 4964 : 1 Planetary
3274_2
24V/173.3Kg-cm/15RPM 168:1 DC Gear Motor
$76.00 15 RPM 136.6 kg·cm 12 mm 2 kg 167 601625 : 1 Planetary

DC Motors with Encoders

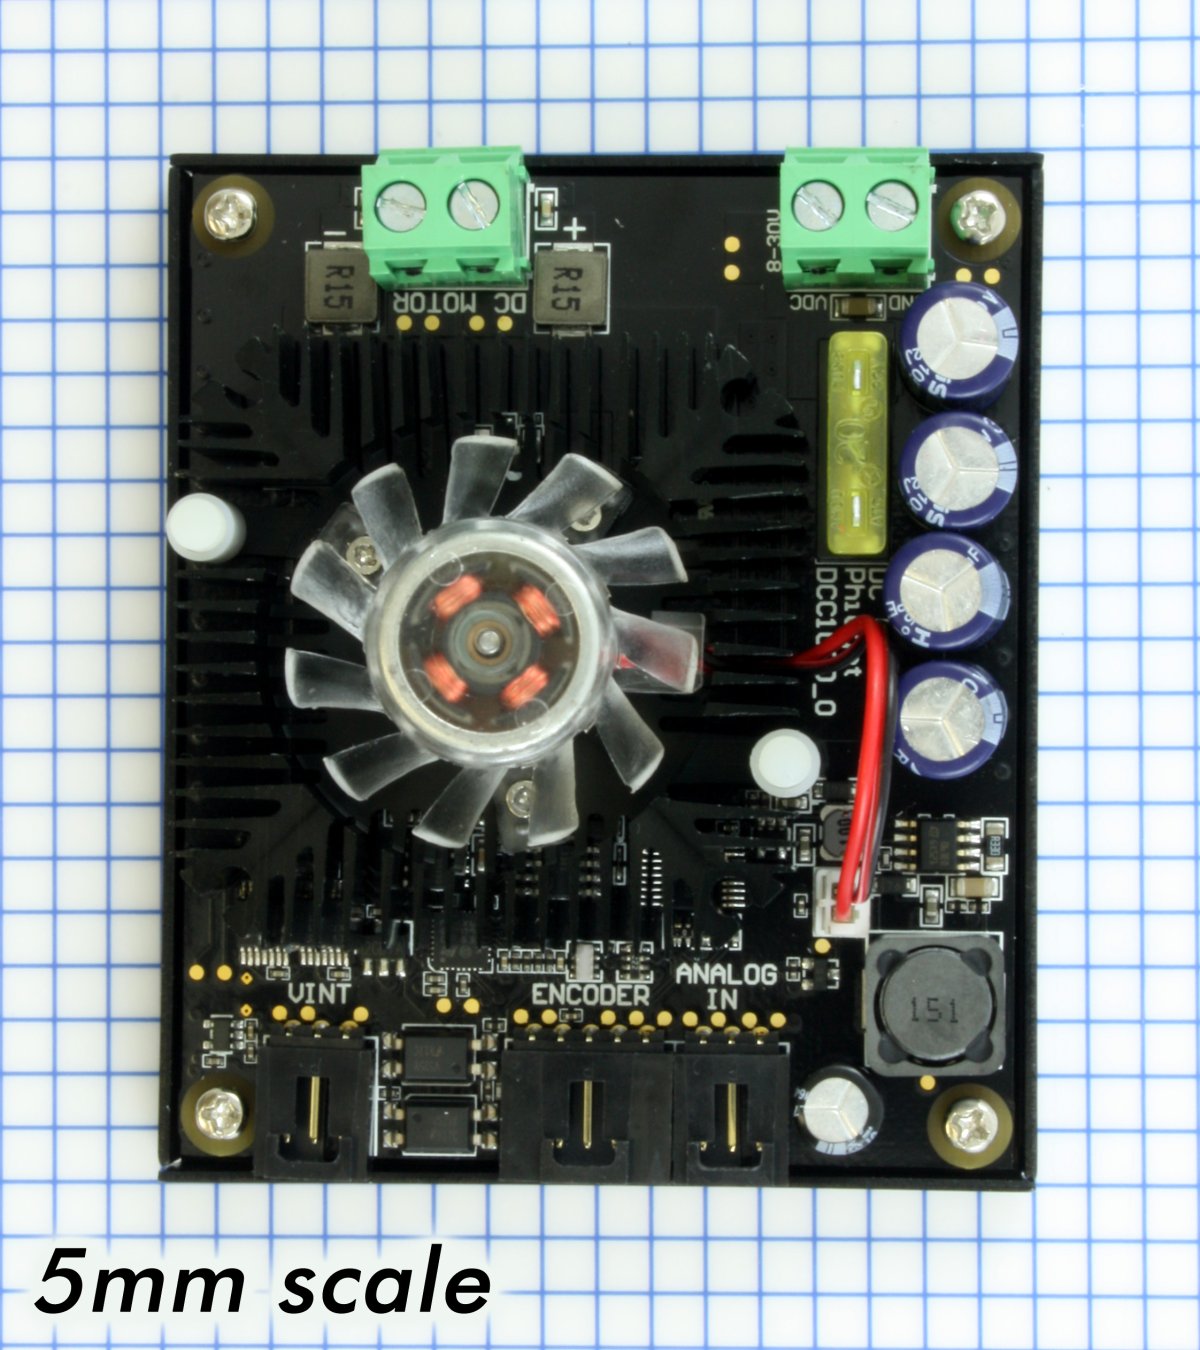
These DC motors all have encoders attached to the rear shaft, allowing for closed-loop position control of your motor. These encoders will connect to the encoder input on the DCC1000 via the cable included with each motor.

Product Motor Properties Physical Properties Gearbox Specifications
Part Number Price Rated Speed Rated Torque Shaft Diameter Weight Gear Ratio Gearbox Type
3261E_1
12V/0.2Kg-cm/1080RPM 3.7:1 DC Gear Motor w/ Encoder
$48.00 1080 RPM 240 g·cm 6 mm 147 g 3 1217 : 1 Planetary

DC Linear Actuators

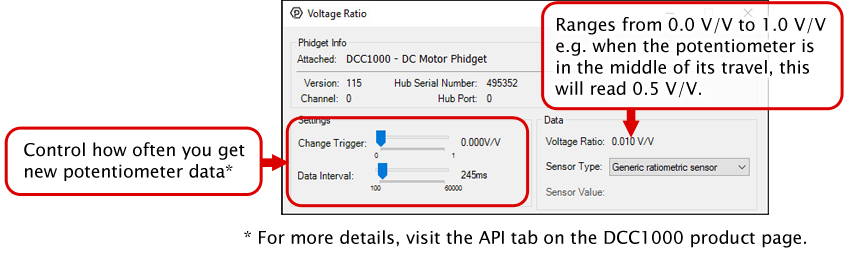
Linear actuators are simply DC motors that are hooked up to a linear screw which causes the shaft to move laterally instead of rotating. Unlike a rotary DC motor, linear actuators have a minimum and maximum position at which the shaft cannot contract or extend any further. On its own, the motor would not be smart enough to stop before attempting to push beyond these limits, possibly damaging the motor. That's why each linear actuator also has a built-in feedback potentiometer so you can monitor the position of the shaft and prevent the actuator from stalling out at its limits. The potentiometer can be read by the analog input on the DCC1000.

Product Motor Properties Electrical Properties Physical Properties
Part Number Price Stroke Length Maximum Speed Peak Power Point Peak Efficiency Point Gear Ratio Rated Voltage Weight
DCL4016_0
DC Linear Actuator - 30mm - 18N
$40.00 30 mm 50 mm/s 18 N 12 V DC 63.6 g
DCL4014_0
DC Linear Actuator - 30mm - 60N
$40.00 30 mm 15 mm/s 60 N 12 V DC 69.9 g
3570_0
DC Linear Actuator - 50mm - 50N
$80.00 50 mm 32 mm/s (@ 16 mm/s) 50 N (@ 24 mm/s) 24 N 35 : 1 12 V DC 56 g
3573_0
DC Linear Actuator - 50mm - 75N
$80.00 50 mm 20 mm/s (@ 10 mm/s) 75 N (@ 15 mm/s) 38 N 63 : 1 12 V DC 56 g
3576_0
DC Linear Actuator - 50mm - 175N
$80.00 50 mm 8 mm/s (@ 4 mm/s) 175 N (@ 7 mm/s) 75 N 150 : 1 12 V DC 56 g
DCL4015_0
DC Linear Actuator - 100mm - 18N
$40.00 100 mm 50 mm/s 18 N 12 V DC 94.3 g
3571_0
DC Linear Actuator - 100mm - 50N
$80.00 100 mm 32 mm/s (@ 16 mm/s) 50 N (@ 24 mm/s) 24 N 35 : 1 12 V DC 74 g
DCL4013_0
DC Linear Actuator - 100mm - 60N
$40.00 100 mm 15 mm/s 60 N 12 V DC 93.9 g
3574_0
DC Linear Actuator - 100mm - 75N
$80.00 100 mm 20 mm/s (@ 10 mm/s) 75 N (@ 15 mm/s) 38 N 63 : 1 12 V DC 74 g
3577_0
DC Linear Actuator - 100mm - 175N
$80.00 100 mm 8 mm/s (@ 4 mm/s) 175 N (@ 7 mm/s) 75 N 150 : 1 12 V DC 74 g
3572_0
DC Linear Actuator - 140mm - 50N
$80.00 140 mm 32 mm/s (@ 16 mm/s) 50 N (@ 24 mm/s) 24 N 35 : 1 12 V DC 84 g
3575_0
DC Linear Actuator - 140mm - 75N
$80.00 140 mm 20 mm/s (@ 10 mm/s) 75 N (@ 15 mm/s) 38 N 63 : 1 12 V DC 84 g
3578_0
DC Linear Actuator - 140mm - 175N
$80.00 140 mm 8 mm/s (@ 4 mm/s) 175 N (@ 7 mm/s) 75 N 150 : 1 12 V DC 84 g

Power Supplies

This Phidget requires a power supply between 8 and 30V DC. We recommend that you use a 12V DC power supply for smaller motors and a 24V supply for larger motors. Check your motor's specifications if you're not sure. For best performance, you should get a 5 amp supply. Select the power supply from the list below that matches your region's wall socket type.

Product Electrical Properties Physical Properties
Part Number Price Power Supply Current Output Voltage Wall Plug Style
PSU4016_0
Power Supply 24VDC 14.6A
$40.00 14.6 A 24 V
PSU4019_0
Power Supply 24VDC 25A Current Limiting
$120.00 25 A 24 V
PSU4015_0
Power Supply DIN Mount 24VDC 1A
$20.00 1 A 24 V
3084_0
Power Supply 12VDC 0.5A - EU
$1.50 500 mA 12 V European
3085_0
Power Supply 12VDC 0.5A - US
$1.50 500 mA 12 V North American
3022_0
Power Supply 12VDC 2.0A - AU
$10.00 2 A 12 V Australian
3023_1
Power Supply 12VDC 2.0A - EU
$10.00 2 A 12 V European
3025_0
Power Supply 12VDC 2.0A - UK
$10.00 2 A 12 V British
PSU4018_0
Power Supply 12VDC 5A
$20.00 5 A 12 V
3086_0
Power Supply 24VDC 1.0A - US
$10.00 1 A 24 V North American
PSU4013_0
Power Supply 24VDC 2.5A
$20.00 2.5 A 24 V
PSU4014_0
Power Supply 24VDC 5A
$40.00 5 A 24 V
3024_1
Power Supply-12VDC 2.0A - US
$10.00 2 A 12 V North American


Part 1: Setup

Select Device

Your Phidget must be connected to a device with a VINT port using a 3-wire Phidget cable.

Which device are you connecting to?

«
»

USB VINT Hub - Select OS

Select your Operating System:

«
»

HUB5000 - Select OS

Select your Operating System:

«
»

SBC3003 - Select OS

Select your Operating System:

«
»

USB VINT Hub - Windows

Step 1: Install Phidgets Library

Step 2: Connect Devices

Step 3: Verify Connection

Step 1: Install Phidgets Library

Before you begin using your Phidgets, you will need to install the Phidget Library.

1. Download the installer for your system:

● 32-bit Installer Download

● 64-bit Installer Download

If you're unsure which one you should get, press ⊞ WIN + Pause/Break:

Before installing our libraries, be sure to read our Software License.

Step 1: Install Phidgets Library

2. Open the download. If it asks you for permission, select Run

Step 1: Install Phidgets Library

3a. Select Next

Step 1: Install Phidgets Library

3b. Read the Licence Agreement. Select Next.

Step 1: Install Phidgets Library

3c. Choose Installation Location. Select Next.

Step 1: Install Phidgets Library

3d. Confirm Install

Step 1: Install Phidgets Library

3e. Wait for Installation to complete. This should only take a few moments.

Step 1: Install Phidgets Library

3f. Installation Complete. Close installation Window.

Step 2: Connect Devices

● Connect USB Cable to your Windows Computer

● Connect VINT Device(s)

Step 3: Verify Connection

1. Open the Phidgets Control Panel:

If your Control Panel does not open, look in your taskbar. Double click the Phidget Icon.

Step 3: Verify Connection

2. If connected, your Phidgets will appear in the Phidget Control Panel.

Done!

If you're able to see and interact with your devices in the Phidget Control Panel, you're done with the Setup part of this guide.

Scroll down to Part 2: Using Your Phidget for the next step.


For more help installing in Windows (e.g. manual install, using a VM, etc.), visit this page:

Windows Advanced Information

«
»

USB VINT Hub - MacOS

Step 1: Install Phidgets Library

Step 2: Connect Devices

Step 3: Verify Connection

Step 1: Install Phidgets Library

Before you begin using your Phidgets, you will need to install the Phidget Library.

1. Download the installer for your system:

● OS X 10.11+: Installer Download

● Mac OS X 10.7 - OS X 10.10: Installer Download

● Mac OS X 10.5 - OS X 10.6: Installer Download


Before installing our libraries, be sure to read our Software License.

Step 1: Install Phidgets Library

2. Open the download and double click on Phidgets.pkg

Step 1: Install Phidgets Library

3a. Select Continue

Step 1: Install Phidgets Library

3b. Read and continue. Read the License and click Agree.

Step 1: Install Phidgets Library

3c. Here, you have the option to select the installation location. Select Install to continue.

Step 1: Install Phidgets Library

3d. MacOS may ask for permission to install. Enter your username and password and Install Software.

Step 1: Install Phidgets Library

3e. Wait for Installation to complete. This should only take a few moments.

Step 1: Install Phidgets Library

3f. You may see a message that the extension has been blocked. Select Open Security Preferences.

Step 1: Install Phidgets Library

3g. Beside the message for Phidgets Inc, Click Allow.

Step 1: Install Phidgets Library

3h. Installation Complete, Click Close.

Step 1: Install Phidgets Library

3i. To delete the installer, click Move to Trash.

Step 2: Connect Devices

● Connect USB Cable to your Mac

● Connect VINT Device(s)

Step 3: Verify Connection

1. Open the Phidgets Control Panel:

Step 3: Verify Connection

2. If connected, your Phidgets will appear in the Phidget Control Panel.

Done!

If you're able to see and interact with your devices in the Phidget Control Panel, you're done with the Setup part of this guide.

Scroll down to Part 2: Using Your Phidget for the next step.


For more info installing in MacOS (e.g. developer tools, driver extension, etc.), visit this page:

MacOS Advanced Information

«
»

USB VINT Hub - Linux

Step 1: Install Phidgets Library

Step 2: Connect Devices

Step 3: Verify Connection

Step 1: Install Phidgets Library

1. First, you need to install the libusb-1.0 development libraries. For example, in Debian based distributions:

apt-get install libusb-1.0-0-dev


You’ll also need a C compiler and builder, if you don’t already have one installed.

apt-get install gcc
apt-get install make

Step 1: Install Phidgets Library

2. Next, download and unpack the Phidgets library:

libphidget22

Step 1: Install Phidgets Library

3. Use the following commands in the location you unpacked to install the library:

./configure
make
sudo make install

Step 1: Install Phidgets Library

4. (Optional) You can also download and unpack the following optional packages:

phidget22networkserver - Phidget Network Server, which enables the use of Phidgets over your network

phidget22admin - Admin tool to track who is connected to your Phidgets when using the network server

libphidget22extra - Required for phidget22networkserver and phidget22admin

libphidget22java - The Java libraries for Phidget22


For installation instructions for these packages, see the README file included with each one.

Step 2: Connect Devices

● Connect USB Cable to your Linux Computer

● Connect VINT Device(s)

Step 3: Verify Connection

1. The easiest way to verify that your libraries are working properly is to compile and run an example program. Download and unpack this C example that will detect any Phidget:

HelloWorld C Example

Step 3: Verify Connection

2. Next, open the terminal in the location where you unpacked the example. Compile and run using:

gcc HelloWorld.c -o HelloWorld -lphidget22
sudo ./HelloWorld

ou should receive a “Hello” line for each Phidget channel that is discovered:

I don’t see any Phidgets show up in the HelloWorld example

You need to run it with sudo in order to be able to access USB devices. In order to use Phidgets without sudo, you need to set your udev rules. See the Advanced Information page on the final slide of this guide for details.

Done!

If you're able to see your devices in the Hello World example, you're done with the Setup part of this guide.

Scroll down to Part 2: Using Your Phidget for the next step.


For more info installing in Linux (e.g. Udev rules, old versions, etc.), visit this page:

Linux Advanced Information

«
»

HUB5000 - Windows

Step 1: Install Phidgets Library

Step 2: Connect Devices

Step 3: Connect Wireless

Step 4: Verify Connection

Step 5: Update

Step 1: Install Phidgets Library

Before you begin using your Phidgets, you will need to install the Phidget Library.

1. Download the installer for your system:

● 32-bit Installer Download

● 64-bit Installer Download

If you're unsure which one you should get, press ⊞ WIN + Pause/Break:

Before installing our libraries, be sure to read our Software License.

Step 1: Install Phidgets Library

2. Open the download. If it asks you for permission, select Run

Step 1: Install Phidgets Library

3a. Select Next

Step 1: Install Phidgets Library

3b. Read the Licence Agreement. Select Next.

Step 1: Install Phidgets Library

3c. Choose Installation Location. Select Next.

Step 1: Install Phidgets Library

3d. Select Next to confirm install.

Step 1: Install Phidgets Library

3e. Wait for Installation to complete. This should only take a few moments.

Step 1: Install Phidgets Library

3f. Installation Complete. Close installation Window.

Step 2: Connect Devices

● Connect Power Jack

● Connect VINT Device(s)

● Connect Ethernet to a Router or Switch (optional)

Step 3: Verify Connection

Choose a setup method:

«
»

Connection (Mobile)

Step 3: Connect Wireless

1. When you connect the power supply to the HUB5000, the red LED should turn on.

Step 3: Connect Wireless

2. On your mobile device, go to the Wi-Fi settings and connect to the HUB5000:

Step 3: Connect Wireless

3. When asked for a password, enter the password printed on the HUB5000’s label.

Step 3: Connect Wireless

4. Once your device is connected to the HUB5000’s WiFi signal:

Click on the WiFi network and find an option that says “Manage router” or “Visit homepage”.

Go to your internet browser and type 192.168.100.1 in the address bar.

Step 3: Connect Wireless

5. Create a password for your HUB5000. You'll use it to access the Configure Page from now on.

Step 3: Connect Wireless

6. Navigate to the network page. Change the Mode to Client.

Step 3: Connect Wireless

7. Enter your Wifi Network details and click Save & Apply. It may take a few minutes for your Phidgets to appear in the Phidget Control Panel, which we’ll check in the next step.

Step 4: Verify Connection

1. Open the Phidgets Control Panel:

If your Control Panel does not open, look in your taskbar. Double click the Phidget Icon.

Step 4: Verify Connection

2. If connected, your Phidgets will appear in the Phidget Control Panel.

Step 5: Update

Now that you've confirmed that you have access to your Phidgets, you should ensure the HUB5000 is fully updated. You can update the firmware of the VINT Hub by going back to the Phidget Control Panel. If there's a blue arrow beside the version number, it means an update is available:

Right-click anywhere on that row and select Upgrade Firmware. When it's done, the number in the Version column will change.

Step 5: Update

Next, to update the OS firmware, go to the Network Phidgets tab in the control panel, find your HUB5000 and double-click on it. If the OS firmware is out of date, you'll see the following window pop up with steps to follow:

1. Download the firmware (you can get it here if the button does not work)

2. Open the web interface by clicking the button or entering the HUB5000's IP address in your web browser.

3. Go to the System tab and scroll down to the Upgrade Firmware section. Select the file you just downloaded and click Upgrade and Restart. You'll be instructed to wait a few minutes before logging back into the web interface.

Step 5: Update

When you log back in, you can confirm that the new version has successfully installed by checking to see if the firmware version listed in the Status section matches the first three numbers in the firmware file name that you downloaded. You can also check the version in the Network Phidgets tab on the Phidget Control Panel.

Done!

Now that you're able to see and interact with your devices in the Phidget Control Panel and they're fully updated, you're done with the Setup part of this guide.

Scroll down to Part 2: Using Your Phidget for the next step.


For more help installing in Windows (e.g. manual install, using a VM, etc.), visit this page:

Windows Advanced Information

«
»

Connection (Ethernet)

Step 3: Connect Wireless

1. When you connect the power supply to the HUB5000, the red LED should turn on.

Step 3: Connect Wireless

2. In your Web Browser, enter hub5000.local

Step 3: Connect Wireless

3. Create a password for your HUB5000. You'll use this password to access the Configure Page from now on.

Step 3: Connect Wireless

4. Navigate to the network page. Change the Mode to Client.

Step 3: Connect Wireless

5. Enter your Wifi Network details to use your Hub wirelessly and click Save & Apply. You can then disconnect the ethernet cable.

It may take a few minutes for your Phidgets to appear in the Phidget Control Panel, which we’ll check in the next step.

Step 4: Verify Connection

1. Open the Phidgets Control Panel:

If your Control Panel does not open, look in your taskbar. Double click the Phidget Icon.

Step 4: Verify Connection

2. If connected, your Phidgets will appear in the Phidget Control Panel.

Step 5: Update

Now that you've confirmed that you have access to your Phidgets, you should ensure the HUB5000 is fully updated. You can update the firmware of the VINT Hub by going back to the Phidget Control Panel. If there's a blue arrow beside the version number, it means an update is available:

Right-click anywhere on that row and select Upgrade Firmware. When it's done, the number in the Version column will change.

Step 5: Update

Next, to update the OS firmware, go to the Network Phidgets tab in the control panel, find your HUB5000 and double-click on it. If the OS firmware is out of date, you'll see the following window pop up with steps to follow:

1. Download the firmware (you can get it here if the button does not work)

2. Open the web interface by clicking the button or entering the HUB5000's IP address in your web browser.

3. Go to the System tab and scroll down to the Upgrade Firmware section. Select the file you just downloaded and click Upgrade and Restart. You'll be instructed to wait a few minutes before logging back into the web interface.

Step 5: Update

When you log back in, you can confirm that the new version has successfully installed by checking to see if the firmware version listed in the Status section matches the first three numbers in the firmware file name that you downloaded. You can also check the version in the Network Phidgets tab on the Phidget Control Panel.

Done!

Now that you're able to see and interact with your devices in the Phidget Control Panel and they're fully updated, you're done with the Setup part of this guide.

Scroll down to Part 2: Using Your Phidget for the next step.


For more help installing in Windows (e.g. manual install, using a VM, etc.), visit this page:

Windows Advanced Information

«
»

HUB5000 - MacOS

Step 1: Install Phidgets Library

Step 2: Connect Devices

Step 3: Connect Wireless

Step 4: Verify Connection

Step 5: Update

Step 1: Install Phidgets Library

Before you begin using your Phidgets, you will need to install the Phidget Library.

1. Download the installer for your system:

● OS X 10.11+: Installer Download

● Mac OS X 10.7 - OS X 10.10: Installer Download

● Mac OS X 10.5 - OS X 10.6: Installer Download


Before installing our libraries, be sure to read our Software License.

Step 1: Install Phidgets Library

2. Open the download and double click on Phidgets.pkg

Step 1: Install Phidgets Library

3a. Select Continue

Step 1: Install Phidgets Library

3b. Read and continue. Read the License and click Agree.

Step 1: Install Phidgets Library

3c. Here, you have the option to select the installation location. Select Install.

Step 1: Install Phidgets Library

3d. MacOS may ask for permission to install. Enter your username and password and Install Software.

Step 1: Install Phidgets Library

3e. Wait for Installation to complete. This should only take a few moments.

Step 1: Install Phidgets Library

3f. You may see a message that the extension has been blocked. Select Open Security Preferences.

Step 1: Install Phidgets Library

3g. Beside the message for Phidgets Inc, Click Allow.

Step 1: Install Phidgets Library

3h. Installation Complete, Click Close.

Step 1: Install Phidgets Library

3i. To delete the installer, click Move to Trash.

Step 2: Connect Devices

● Connect Power Jack

● Connect VINT Device(s)

● Connect Ethernet to a Router or Switch (optional)

Step 3: Verify Connection

Choose a setup method:

«
»

Connection (Mobile)

Step 3: Connect Wireless

1. When you connect the power supply to the HUB5000, the red LED should turn on.

Step 3: Connect Wireless

2. On your mobile device, go to the Wi-Fi settings and connect to the HUB5000:

Step 3: Connect Wireless

3. When asked for a password, enter the password printed on the HUB5000’s label.

Step 3: Connect Wireless

4. Once your device is connected to the HUB5000’s WiFi signal:

Click on the WiFi network and find an option that says “Manage router” or “Visit homepage”.

Go to your internet browser and type 192.168.100.1 in the address bar.

Step 3: Connect Wireless

5. Create a password for your HUB5000. You'll use this password to access the Configure Page from now on.

Step 3: Connect Wireless

6. Navigate to the network page. Change the Mode to Client.

Step 3: Connect Wireless

7. Enter your Wifi Network details and click Save & Apply. It may take a few minutes for your Phidgets to appear in the Phidget Control Panel, which we’ll check in the next step.

Step 4: Verify Connection

1. Open the Phidget Control Panel:

Step 4: Verify Connection

2. If connected, your Phidgets will appear in the Phidget Control Panel.

Step 5: Update

Now that you've confirmed that you have access to your Phidgets, you should ensure the HUB5000 is fully updated. You can update the firmware of the VINT Hub by going back to the Phidget Control Panel. If the name of the device is red, it means an update is available:

Double click on the device in the control panel to update the VINT Hub firmware. When it's finished, the text will turn from red to black and the number in the Version column will change.

Step 5: Update

To upgrade the firmware of the operating system on the HUB5000, download the most recent file here.

Next, go back to the web configuration page and click on the System tab. Scroll down to Upgrade Firmware and select the file you download and hit Upgrade & Restart. You'll be instructed to wait a few minutes before logging back into the web interface.

When you log back in, you can confirm that the new version has successfully installed by checking to see if the firmware version listed in the Status section matches the first three numbers in the firmware file name that you downloaded.

Done!

Now that you're able to see and interact with your devices in the Phidget Control Panel, you're done with the Setup part of this guide.

Scroll down to Part 2: Using Your Phidget for the next step.


For more info installing in MacOS (e.g. developer tools, driver extension, etc.), visit this page:

MacOS Advanced Information

«
»

Connection (Ethernet)

Step 3: Connect Wireless

1. When you connect the power supply to the HUB5000, the red LED should turn on.

Step 3: Connect Wireless

2. In your Web Browser, enter hub5000.local

Step 3: Connect Wireless

3. Create a password for your HUB5000. You'll use this password to access the Configure Page from now on.

Step 3: Connect Wireless

4. Navigate to the network page. Change the Mode to Client.

Step 3: Connect Wireless

5. Enter your Wifi Network details to use your Hub wirelessly and click Save & Apply. You can then disconnect the ethernet cable.

It may take a few minutes for your Phidgets to appear in the Phidget Control Panel, which we’ll check in the next step.

Step 4: Verify Connection

1. Open the Phidget Control Panel:

Step 4: Verify Connection

2. If connected, your Phidgets will appear in the Phidget Control Panel.

Step 5: Update

Now that you've confirmed that you have access to your Phidgets, you should ensure the HUB5000 is fully updated. You can update the firmware of the VINT Hub by going back to the Phidget Control Panel. If the name of the device is red, it means an update is available:

Double click on the device in the control panel to update the VINT Hub firmware. When it's finished, the text will turn from red to black and the number in the Version column will change.

Step 5: Update

To upgrade the firmware of the operating system on the HUB5000, download the most recent file here.

Next, go back to the web configuration page and click on the System tab. Scroll down to Upgrade Firmware and select the file you download and hit Upgrade & Restart. You'll be instructed to wait a few minutes before logging back into the web interface.

When you log back in, you can confirm that the new version has successfully installed by checking to see if the firmware version listed in the Status section matches the first three numbers in the firmware file name that you downloaded.

Done!

Now that you're able to see and interact with your devices in the Phidget Control Panel, you're done with the Setup part of this guide.

Scroll down to Part 2: Using Your Phidget for the next step.


For more info installing in MacOS (e.g. developer tools, driver extension, etc.), visit this page:

MacOS Advanced Information

«
»

HUB5000 - Linux

Step 1: Install Phidgets Library

Step 2: Connect Devices

Step 3: Connect Wireless

Step 4: Verify Connection

Step 5: Update

Step 1: Install Phidgets Library

1. First, you need to install the libusb-1.0 development libraries. For example, in Debian based distributions:

apt-get install libusb-1.0-0-dev


You’ll also need a C compiler and builder, if you don’t already have one installed.

apt-get install gcc
apt-get install make

Step 1: Install Phidgets Library

2. Next, download and unpack the Phidgets library:

libphidget22

Step 1: Install Phidgets Library

3. Use the following commands in the location you unpacked to install the library:

./configure
make
sudo make install

Step 1: Install Phidgets Library

4. (Optional) You can also download and unpack the following optional packages:

phidget22networkserver - Phidget Network Server, which enables the use of Phidgets over your network

phidget22admin - Admin tool to track who is connected to your Phidgets when using the network server

libphidget22extra - Required for phidget22networkserver and phidget22admin

libphidget22java - The Java libraries for Phidget22


For installation instructions for these packages, see the README file included with each one.

Step 2: Connect Devices

● Connect Power Jack

● Connect VINT Device(s)

● Connect Ethernet to a Router or Switch (optional)

Step 3: Verify Connection

Choose a setup method:

«
»

Connection (Mobile)

Step 3: Connect Wireless

1. When you connect the power supply to the HUB5000, the red LED should turn on.

Step 3: Connect Wireless

2. On your mobile device, go to the Wi-Fi settings and connect to the HUB5000:

Step 3: Connect Wireless

3. When asked for a password, enter the password printed on the HUB5000’s label.

Step 3: Connect Wireless

4. Once your device is connected to the HUB5000’s WiFi signal:

Click on the WiFi network and find an option that says “Manage router” or “Visit homepage”.

Go to your internet browser and type 192.168.100.1 in the address bar.

Step 3: Connect Wireless

5. Create a password for your HUB5000. You'll use this password to access the Configure Page from now on.

Step 3: Connect Wireless

6. Navigate to the network page. Change the Mode to Client.

Step 3: Connect Wireless

7. Enter your Wifi Network details and click Save & Apply. It may take a few minutes for your Phidgets to appear in the Phidget Control Panel, which we’ll check in the next step.

Step 4: Verify Connection

1. The easiest way to verify that your libraries are working properly is to compile and run an example program. Download and unpack this C example that will detect any Phidget:

HelloWorld C Example

Step 4: Verify Connection

2. Next, open the terminal in the location where you unpacked the example. Compile and run using:

gcc HelloWorld.c -o HelloWorld -lphidget22
sudo ./HelloWorld

ou should receive a “Hello” line for each Phidget channel that is discovered:

I don’t see any Phidgets show up in the HelloWorld example

You need to run it with sudo in order to be able to access USB devices. In order to use Phidgets without sudo, you need to set your udev rules. See the Advanced Information page on the final slide of this guide for details.

Step 5: Update

Now that you've confirmed that you have access to your Phidgets, you should ensure the HUB5000 is fully updated. You can update the firmware of the VINT Hub using the phidget22admin tool (see included readme for further instructions).

To upgrade the firmware of the operating system on the HUB5000, download the most recent file here.

Next, go back to the web configuration page and click on the System tab. Scroll down to Upgrade Firmware and select the file you download and hit Upgrade & Restart. You'll be instructed to wait a few minutes before logging back into the web interface.

When you log back in, you can confirm that the new version has successfully installed by checking to see if the firmware version listed in the Status section matches the first three numbers in the firmware file name that you downloaded.

Done!

Now that you're able to see your devices in the Hello World example and the device is fully updated, you're done with the Setup part of this guide.

Scroll down to Part 2: Using Your Phidget for the next step.


For more info installing in Linux (e.g. Udev rules, old versions, etc.), visit this page:

Linux Advanced Information

«
»

Connection (Ethernet)

Step 3: Connect Wireless

1. When you connect the power supply to the HUB5000, the red LED should turn on.

Step 3: Connect Wireless

2. In your Web Browser, enter hub5000.local

Step 3: Connect Wireless

3. Create a password for your HUB5000. You'll use this password to access the Configure Page from now on.

Step 3: Connect Wireless

4. Navigate to the network page. Change the Mode to Client.

Step 3: Connect Wireless

5. Enter your Wifi Network details to use your Hub wirelessly and click Save & Apply. You can then disconnect the ethernet cable.

It may take a few minutes for your Phidgets to appear in the Phidget Control Panel, which we’ll check in the next step.

Step 4: Verify Connection

1. The easiest way to verify that your libraries are working properly is to compile and run an example program. Download and unpack this C example that will detect any Phidget:

HelloWorld C Example

Step 4: Verify Connection

2. Next, open the terminal in the location where you unpacked the example. Compile and run using:

gcc HelloWorld.c -o HelloWorld -lphidget22
sudo ./HelloWorld

You should receive a “Hello” line for each Phidget channel that is discovered:

I don’t see any Phidgets show up in the HelloWorld example

You need to run it with sudo in order to be able to access USB devices. In order to use Phidgets without sudo, you need to set your udev rules. See the Advanced Information page on the final slide of this guide for details.

Step 5: Update

Now that you've confirmed that you have access to your Phidgets, you should ensure the HUB5000 is fully updated. You can update the firmware of the VINT Hub using the phidget22admin tool (see included readme for further instructions).

To upgrade the firmware of the operating system on the HUB5000, download the most recent file here.

Next, go back to the web configuration page and click on the System tab. Scroll down to Upgrade Firmware and select the file you download and hit Upgrade & Restart. You'll be instructed to wait a few minutes before logging back into the web interface.

When you log back in, you can confirm that the new version has successfully installed by checking to see if the firmware version listed in the Status section matches the first three numbers in the firmware file name that you downloaded.

Done!

Now that you're able to see your devices in the Hello World example and the device is fully updated, you're done with the Setup part of this guide.

Scroll down to Part 2: Using Your Phidget for the next step.


For more info installing in Linux (e.g. Udev rules, old versions, etc.), visit this page:

Linux Advanced Information

«
»

SBC3003 - Windows

Step 1: Install Phidgets Library

Step 2: Connect Devices

Step 3: Verify Connection

Step 4: Connect Wireless

Step 1: Install Phidgets Library

Before you begin using your Phidgets, you will need to install the Phidget Library.

1. Download the installer for your system:

● 32-bit Installer Download

● 64-bit Installer Download

If you're unsure which one you should get, press ⊞ WIN + Pause/Break:

Before installing our libraries, be sure to read our Software License.

Step 1: Install Phidgets Library

2. Open the download. If it asks you for permission, select Run.

Step 1: Install Phidgets Library

3a. Select Next.

Step 1: Install Phidgets Library

3b. Read the Licence Agreement. Select Next.

Step 1: Install Phidgets Library

3c. Choose Installation Location. Select Next.

Step 1: Install Phidgets Library

3d. Select Next.

Step 1: Install Phidgets Library

3e. Wait for Installation to complete. This should only take a few moments.

Step 1: Install Phidgets Library

3f. Installation Complete. Close installation Window.

Step 2: Connect Devices

● Connect Power Jack

● Connect VINT Device(s)

● Connect Ethernet to a Router or Switch in the same network as your Windows PC

Step 3: Verify Connection

1. Open the Phidgets Control Panel:

If your Control Panel does not open, look in your taskbar. Double click the Phidget Icon.

Step 3: Verify Connection

2. If connected, your Phidgets will appear in the Phidget Control Panel.

Now that the SBC's ethernet connection is verified, it can be connected to wifi.

If you don't have a USB wifi adapter or you're planning to stay on ethernet, you can scroll down to

Part 2: Using Your Phidget

Step 4: Connect Wireless

1. In your web browser, enter phidgetsbc.local

Step 4: Connect Wireless

2. Create a password for your SBC. You'll use this to access the configuration page from now on.

Step 4: Connect Wireless

3. Navigate to Network -> Wireless. Select your Network, enter the wifi password and select Add This Network.

Step 4: Connect Wireless

4. Scroll down to your saved networks, click on your network and select Join This Network.

Step 4: Connect Wireless

5. It should now say connected in the status column.

You can now unplug the ethernet cable.

Step 4: Connect Wireless

6. Return to the Phidget Control Panel to access your Phidgets.

Done!

If you're able to see and interact with your devices in the Phidget Control Panel, you're done with the Setup part of this guide.

Scroll down to Part 2: Using Your Phidget for the next step.


For more help installing in Windows (e.g. manual install, using a VM, etc.), visit this page:

Windows Advanced Information

«
»

SBC3003 - MacOS

Step 1: Install Phidgets Library

Step 2: Connect Devices

Step 3: Verify Connection

Step 4: Connect Wireless

Step 1: Install Phidgets Library

Before you begin using your Phidgets, you will need to install the Phidget Library.

1. Download the installer for your system:

● OS X 10.11+: Installer Download

● Mac OS X 10.7 - OS X 10.10: Installer Download

● Mac OS X 10.5 - OS X 10.6: Installer Download


Before installing our libraries, be sure to read our Software License.

Step 1: Install Phidgets Library

2. Open the download and double click on Phidgets.pkg

Step 1: Install Phidgets Library

3a. Select Continue

Step 1: Install Phidgets Library

3b. Read and continue. Read the License and click Agree.

Step 1: Install Phidgets Library

3c. Here, you have the option to select the installation location. Select Install.

Step 1: Install Phidgets Library

3d. MacOS may ask for permission to install. Enter your username and password and Install Software.

Step 1: Install Phidgets Library

3e. Wait for Installation to complete. This should only take a few moments.

Step 1: Install Phidgets Library

3f. You may see a message that the extension has been blocked. Select Open Security Preferences.

Step 1: Install Phidgets Library

3g. Click Allow.

Step 1: Install Phidgets Library

3h. Installation Complete, Click Close.

Step 1: Install Phidgets Library

3i. To delete the installer, click Move to Trash.

Step 2: Connect Devices

● Connect Power Jack

● Connect VINT Device(s)

● Connect Ethernet to a Router or Switch in the same network as your Mac

Step 3: Verify Connection

1. Open the Phidget Control Panel:

Step 3: Verify Connection

2. If connected, your Phidgets will appear in the Phidget Control Panel.

Now that the SBC's ethernet connection is verified, it can be connected to wifi.

If you don't have a USB wifi adapter or you're planning to stay on ethernet, you can scroll down to

Part 2: Using Your Phidget

Step 4: Connect Wireless

1. In your web browser, enter phidgetsbc.local

Step 4: Connect Wireless

2. Create a password for your SBC. You will use this to access the configuration page from now on.

Step 4: Connect Wireless

3. Navigate to Network -> Wireless. Select your Network, enter the wifi password and select Add This Network.

Step 4: Connect Wireless

4. Scroll down to your saved networks, click on your network and select Join This Network.

Step 4: Connect Wireless

5. It should now say connected in the status column.

You can now unplug the ethernet cable.

Step 4: Connect Wireless

6. Return to the Phidget Control Panel to access your Phidgets.

Done!

If you're able to see and interact with your devices in the Phidget Control Panel, you're done with the Setup part of this guide.

Scroll down to Part 2: Using Your Phidget for the next step.


For more info installing in MacOS (e.g. developer tools, driver extension, etc.), visit this page:

MacOS Advanced Information

«
»

SBC3003 - Linux

Step 1: Install Phidgets Library

Step 2: Connect Devices

Step 3: Verify Connection

Step 4: Connect Wireless

Step 1: Install Phidgets Library

1. First, you need to install the libusb-1.0 development libraries. For example, in Debian based distributions:

apt-get install libusb-1.0-0-dev


You’ll also need a C compiler and builder, if you don’t already have one installed.

apt-get install gcc
apt-get install make

Step 1: Install Phidgets Library

2. Next, download and unpack the Phidgets library:

libphidget22

Step 1: Install Phidgets Library

3. Use the following commands in the location you unpacked to install the library:

./configure
make
sudo make install

Step 1: Install Phidgets Library

4. (Optional) You can also download and unpack the following optional packages:

phidget22networkserver - Phidget Network Server, which enables the use of Phidgets over your network

phidget22admin - Admin tool to track who is connected to your Phidgets when using the network server

libphidget22extra - Required for phidget22networkserver and phidget22admin

libphidget22java - The Java libraries for Phidget22


For installation instructions for these packages, see the README file included with each one.

Step 2: Connect Devices

● Connect Power Jack

● Connect VINT Device(s)

● Connect Ethernet to a Router or Switch in the same network as your Linux machine

Step 3: Verify Connection

1. The easiest way to verify that your libraries are working properly is to compile and run an example program. Download and unpack this C example that will detect any Phidget:

HelloWorld C Example

Step 3: Verify Connection

2. Next, open the terminal in the location where you unpacked the example. Compile and run using:

gcc HelloWorld.c -o HelloWorld -lphidget22
sudo ./HelloWorld

If everything is working, you should receive a “Hello” line for each Phidget channel that is discovered:

I don’t see any Phidgets show up in the HelloWorld example

You need to run it with sudo in order to be able to access USB devices. In order to use Phidgets without sudo, you need to set your udev rules. See the Advanced Information page on the final slide of this guide for details.

Now that the SBC's ethernet connection is verified, it can be connected to wifi.

If you don't have a USB wifi adapter or you're planning to stay on ethernet, you can scroll down to

Part 2: Using Your Phidget

Step 4: Connect Wireless

1. In your web browser, enter phidgetsbc.local

If you're using a terminal-only Linux machine, use the browser on your phone instead.

(If you use a phone, you need to enter the IP address your router assigned to the SBC instead of phidgetsbc.local)

Step 4: Connect Wireless

2. Create a password for your SBC. You will use this to access the configuration page from now on.

Step 4: Connect Wireless

3. Navigate to Network -> Wireless. Select your Network, enter the wifi password and select Add This Network.

Step 4: Connect Wireless

4. Scroll down to your saved networks, click on your network and select Join This Network.

Step 4: Connect Wireless

5. It should now say connected in the status column.

You can now unplug the ethernet cable.

Step 4: Connect Wireless

6. Run the HelloWorld example again to confirm that your Phidgets are accessible over wifi.

Done!

If you're able to see your devices in the Hello World example, you're done with the Setup part of this guide.

Scroll down to Part 2: Using Your Phidget for the next step.


For more info installing in Linux (e.g. Udev rules, old versions, etc.), visit this page:

Linux Advanced Information

«
»

Part 2: Using Your Phidget

About

The DCC1000 allows you to control a DC motor or DC linear actuator. With this Phidget, you can control your motor by:

  • Setting the velocity and acceleration with the DC Motor Controller
  • Setting a specific target position using the Motor Position Controller (requires an encoder)

You can use the DCC1000 to monitor current passing through the motor, connect and monitor the motor’s potentiometer, and monitor the temperature of the motor.

DCC1000 About.jpg

Explore Your Phidget Channels Using the Control Panel

You can use your Control Panel to explore your Phidget's channels.

1. Open your Control Panel, and you will find the following channels:

DCC1000 Panel.jpg

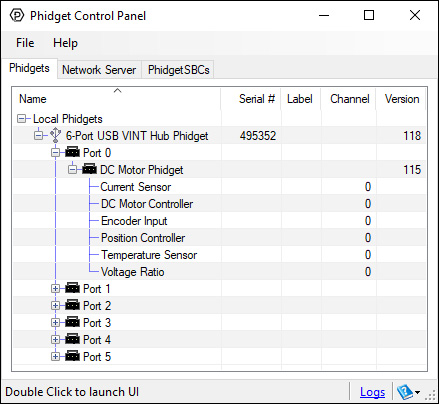
2. Double click on a channel to open an example program. Each channel belongs to one of these channel classes:

Expand All
DC Motor Controller: Controls the velocity and current of the motor, and the on-board fan

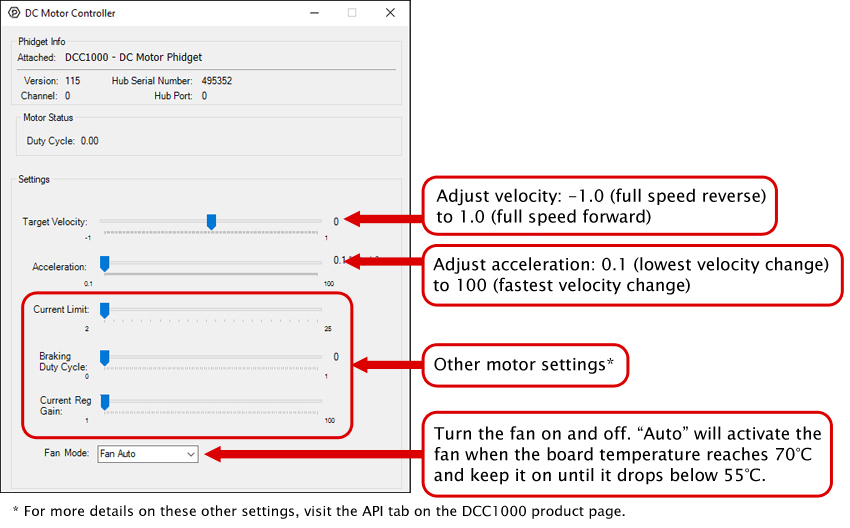
In your Control Panel, double click on "DC Motor Controller":

DCC1000-DCMotor.jpg
Position Controller: A built-in PID position controller

In your Control Panel, double click on "Position Controller":

DCC1000-MPC.jpg
Encoder Input: Reads encoder input so you can implement closed-loop control of the motor

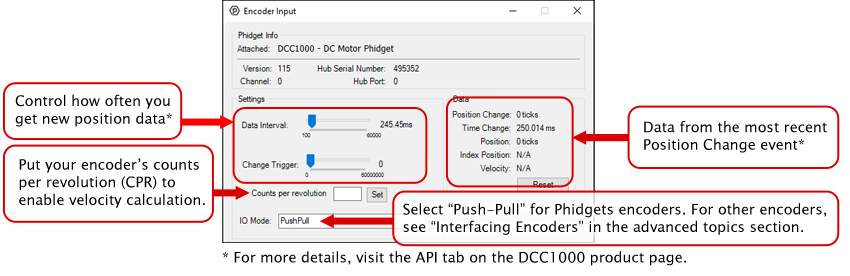
In your Control Panel, double click on "Encoder Input":

DCC1000-Enc.jpg
Current Sensor: Measures the amount of current flowing through the motor's coils

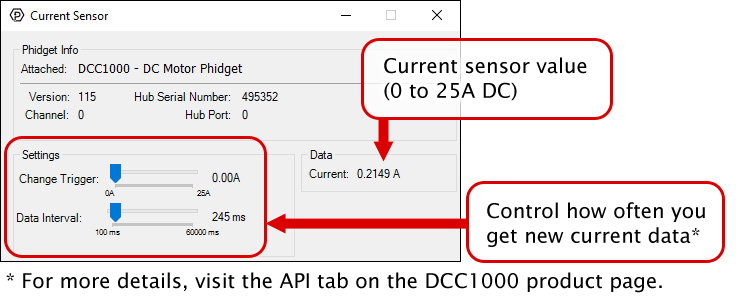
In your Control Panel, double click on "Current Sensor":

DCC1000-Cur.jpg
Voltage Ratio: Measures the "Analog In" port (Intended for feedback potentiometers that some motors have)

In your Control Panel, double click on "Voltage Ratio":

DCC1000-Voltageratio.jpg
Temperature Sensor: Measures the board temperature so you can tell if the DCC1000 is overheating

In your Control Panel, double click on "Temperature Sensor":

DCC1000-Temp.jpg

Part 3: Create your Program

1. Setting up your Programming Environment
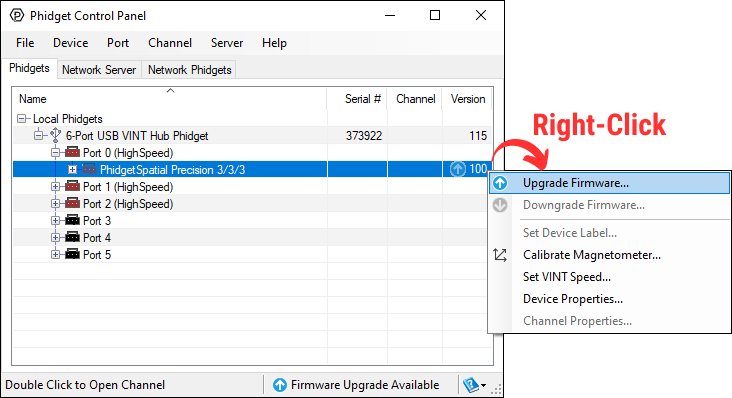
2. Phidget Programming Basics

Part 4: Advanced Topics and Troubleshooting

Expand All
Upgrading or Downgrading Device Firmware

Firmware Upgrade

MacOS users can upgrade device firmware by double-clicking the device row in the Phidget Control Panel.

Linux users can upgrade via the phidget22admin tool (see included readme for instructions).

Windows users can upgrade the firmware for this device using the Phidget Control Panel as shown below.
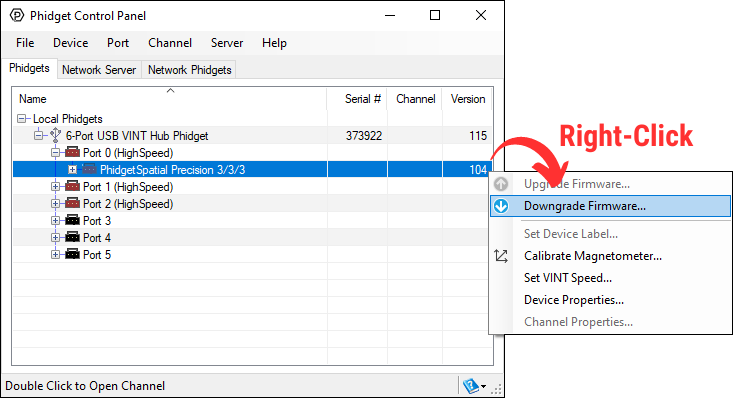
ControlpanelFWup.jpg

Firmware Downgrade

Firmware upgrades include important bug fixes and performance improvements, but there are some situations where you may want to revert to an old version of the firmware (for instance, when an application you're using is compiled using an older version of phidget22 that doesn't recognize the new firmware).

MacOS and Linux users can downgrade using the phidget22admin tool in the terminal (see included readme for instructions).

Windows users can downgrade directly from the Phidget Control Panel if they have driver version 1.9.20220112 or newer:

ControlpanelFWdown.jpg

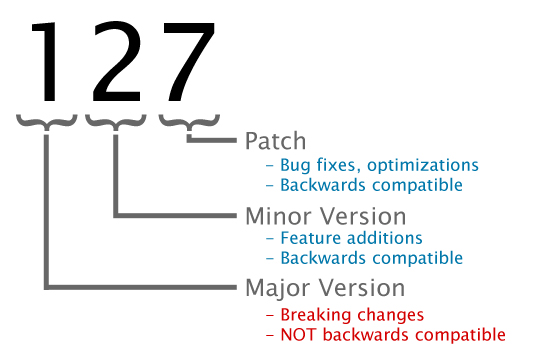
Firmware Version Numbering Schema

Phidgets device firmware is represented by a 3-digit number. For firmware patch notes, see the device history section on the Specifications tab on your device's product page.

FWversion.jpg

  • If the digit in the 'ones' spot changes, it means there have been bug fixes or optimizations. Sometimes these changes can drastically improve the performance of the device, so you should still upgrade whenever possible. These upgrades are backwards compatible, meaning you can still use this Phidget on a computer that has Phidget22 drivers from before this firmware upgrade was released.
  • If the digit in the 'tens' spot changes, it means some features were added (e.g. new API commands or events). These upgrades are also backwards compatible, in the sense that computers running old Phidget22 drivers will still be able to use the device, but they will not be able to use any of the new features this version added.
  • If the digit in the 'hundreds' spot changes, it means a major change has occurred (e.g. a complete rewrite of the firmware or moving to a new architecture). These changes are not backwards compatible, so if you try to use the upgraded board on a computer with old Phidget22 drivers, it will show up as unsupported in the Control Panel and any applications build using the old libraries won't recognize it either. Sometimes, when a Phidget has a new hardware revision (e.g. 1018_2 -> 1018_3), the firmware version's hundreds digit will change because entirely new firmware was needed (usually because a change in the processor). In this case, older hardware revisions won't be able to be upgraded to the higher version number and instead continue to get bug fixes within the same major revision.
PositionController Settings

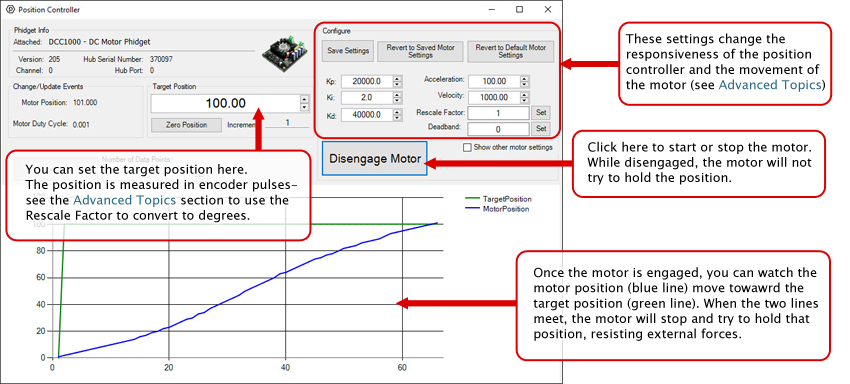
There are a number of settings that can be adjusted to customize the position controller. You can save these variables into the program so you don't have to re-enter them manually (NOTE: This does not store the settings on the DCC1000, it simply saves them inside the control panel program, so you'll have to re-enter them if it's used on another computer).

Kp, Ki, and Kd

You can set the control parameters Kp, Ki, and Kd in order to change the behavior of the control loop. For more information on how each of these three tuning parameters affect the control loop, see “Control Loop Parameters ”.

Velocity and Acceleration

Velocity is how fast the motor will move to the target position, and acceleration controls how quickly the motor will reach its velocity and how quickly it will slow down. These values are measured in position per second and position per second squared, and position by default is measured in encoder pulses.

Rescale Factor

If you want position to be measured in another unit (degrees, for example), you can set the rescale factor. For more information on choosing the correct rescale factor, see “Setting the Rescale Factor”.

Deadband

Sometimes the motor will oscillate back and forth across the target position when holding position. Adding a deadband will widen the target position so the motor will stop when it gets within the target position plus or minus the deadband.

Current Limit

Setting the current limit gives you control over how much power is being supplied to the motor. Generally, we advise that you set the current limit to your motor’s specified coil current.

Fan Mode

This turns the cooling fan on and off. Setting it to auto will result in the fan turning on only when the temperature sensor detects rising board temperatures.

Encoder IO Mode

Changes between different encoder modes based on your encoder’s circuitry. For more information see the Encoder Guide.

Current Regulator Gain

Depending on power supply voltage and motor coil inductance, the current through the motor can change relatively slowly or extremely rapidly. A physically larger DC Motor will typically have a lower inductance, requiring a higher current regulator gain. A higher power supply voltage will result in motor current changing more rapidly, requiring a higher current regulator gain. If the current regulator gain is too small, spikes in current will occur, causing large variations in torque, and possibly damaging the motor controller. If the current regulator gain is too high, the current will jitter, causing the motor to sound 'rough', especially when changing directions.

Control Loop Parameters

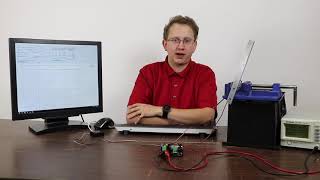
In order to get the desired behavior from your controller, you will have to tune your control parameters. This video explains the tuning procedure and gives information on how the controller works.

Interfacing Encoders

The DCC1000 can connect to any of the encoders we sell without any modification just by setting the EncoderIOMode property to Push-Pull . If you're trying to use your own encoder, you may need to change the IO mode to Open Collector or Line Driver mode. Have a look at the Encoder Guide for more details on what to use.

Setting the Rescale Factor

There are three pieces of information to consider when setting a rescale factor to change your units into degrees or rotations:

  • Your encoder's CPR (counts per rotation)
  • Your encoder interface's resolution
  • Your motor's gear ratio

First, check your encoder's datasheet for the CPR. It's usually 360 or 300. This is the number of quadrature cycles the encoder will send out for one full rotation.

Next, you need your encoder interface's resolution. The encoder port on the DCC1000 has a x4 resolution, meaning it reads in 4 pulses per quadrature cycle (see the Encoder Guide for a more in-depth explanation).

Next, you need to find out the gear ratio in your motor's datasheet. Note: If you plan on having your motor run for many rotations in a row, try to find the exact gear ratio, expressed as a fraction. Using the rounded value will result in accumulating errors the more you rotate.

Once you have these numbers, you can calculate the rescale factor:

DCC1000-equations.jpg

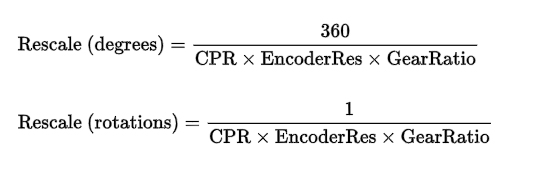
For example, if you wanted to have your motor's position measured in degrees and your encoder had 300 CPR and your motor had a 50 801⁄895 : 1 gearbox, you would set your rescale factor to 360 / 300*4*(50+(801/895)), or 0.005894.


Setting the Change Trigger and Data Interval

The Change Trigger is the minimum change in the sensor data needed to trigger a new data event.

The Data Interval is the time (in ms) between data events sent out from your Phidget.

The Data Rate is the reciprocal of Data Interval (measured in Hz), and setting it will set the reciprocal value for Data Interval and vice-versa.

You can modify one or both of these values to achieve different data outputs. You can learn more about these properties here.

How can I plot or record sensor data?

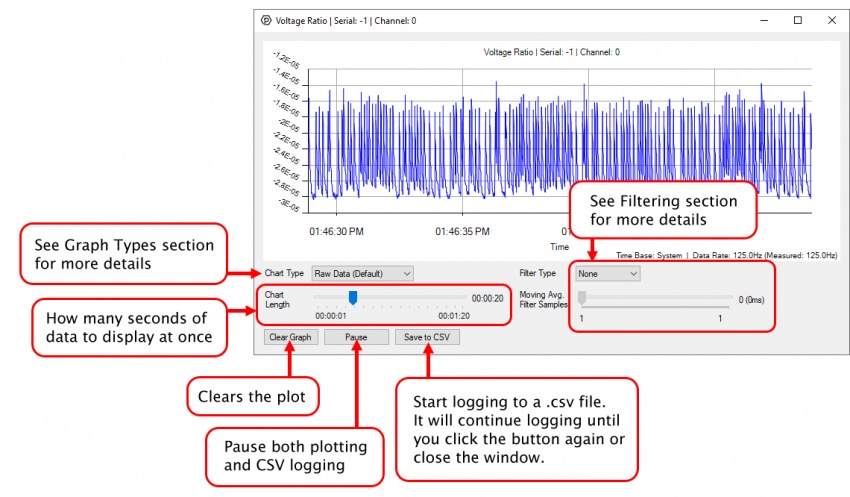
Note: Graphing and logging is currently only supported in the Windows version of the Phidget Control Panel.

In the Phidget Control Panel, open the channel for your device and click on the Plot.jpg icon next to the data type that you want to plot. This will open up a new window:

Plot2.jpg

If you need more complex functionality such as logging multiple sensors to the same sheet or performing calculations on the data, you'll need to write your own program. Generally this will involve addressing the correct channel, opening it, and then creating an Event Handler and adding graphing/logging code to it.

The quickest way to get started is to download some sample code for your desired programming language and then search google for logging or plotting in that language (e.g. "how to log to csv in python") and add the code to the existing change handler.

Filtering

You can perform filtering on the raw data in order to reduce noise in your graph. For more information, see the Control Panel Graphing page.

Graph Type

You can perform a transform on the incoming data to get different graph types that may provide insights into your sensor data. For more information on how to use these graph types, see the Control Panel Graphing page.

My motor moves away from the target position in Position Controller mode!

Reverse your motor’s wires. The control loop has to make an assumption about what direction your motor moves with a positive voltage, and in this case, the assumption was incorrect. Don’t worry, DC motors are fine being wired up backward since they’re essentially just a long loop of wire on the inside.

Product Specifications

Board Properties
Controlled By VINT
VINT Communication Speed Max 10 kbit/s
Voltage Sensor
Number of Voltage Inputs 1
Sampling Interval Min 500 ms/sample
Sampling Interval Max 60 s/sample
VoltageRatio Input Resolution 0.00026
Input Voltage Min (DC) 0 V DC
Input Voltage Max (DC) 5 V DC
Measurement Error Max 0.5 %
Sensor Input Impedance 324 kΩ
Controller Properties
Motor Type DC Motor
Number of Motor Ports 1
Velocity Resolution 0.001 Duty Cycle
Acceleration Resolution 1 Duty Cycle/s
Acceleration Min 0.5 Duty Cycle/s
Acceleration Max 10000 Duty Cycle/s
Acceleration Time Min 20 ms
Acceleration Time Max 20 s
PWM Frequency 25 kHz
Sampling Interval Min 50 ms/sample
Sampling Interval Max 60 s/sample
Current Limit Resolution 17.9 mA
Electrical Properties
Continuous Motor Current Max 25 A
Supply Voltage Min 8 V DC
Supply Voltage Max 30 V DC
Current Consumption (Unconfigured) (VINT Port) 500 μA
Current Consumption Max (VINT Port) 2 mA
Power Consumption (Unconfigured) 288 mW
Power Consumption motor power plus 700 mW
Replacement Fuse 20A Slow Blow Blade Type, Regular or Micro
Encoder Interface
Number of Encoder Inputs 1
Encoder Interface Resolution x4
Count Rate Max 400000 pulses/s
Time Resolution 1 μs
Sampling Interval Min 50 ms/sample
Sampling Interval Max 60 s/sample
Encoder Input Low Voltage Max 800 mV DC
Encoder Input High Voltage Min 2 V DC
Temperature Sensor
Temperature Resolution 0.04 °C
Physical Properties
Recommended Wire Size 10 - 26 AWG
Operating Temperature Min -40 °C
Operating Temperature Max 85 °C
Customs Information
Canadian HS Export Code 8471.80.00
American HTS Import Code 8471.80.40.00
Country of Origin CN (China)

Cable Length Calculator

Documents

Product History

Date Board Revision Device Version Comment
August 2017 0 115 Product Release
October 2017 0 204 Added MotorPositionController support; motor rotation direction was also reversed to be consistent with other Phidget motor controllers and encoders
January 2018 0 205 Fixed issue with encoder input
March 2018 0 206 Fixed issue where duty cycle never reached 1.0
April 2019 0 207 Fixed averaging of duty cycle when limiting current
May 2019 0 210 Added failsafe timer functionality
February 2020 0 211 Fixed saturation warnings triggering at 25A
April 2022 0 220 Position control math uses doubles instead of floats. Failsafe timer now reset by any successful packet.

Software Objects

Channel NameAPIChannel
DC Motor Controller DCMotor 0
Encoder Input Encoder 0
Voltage Ratio VoltageRatioInput 0
Temperature Sensor TemperatureSensor 0
Current Sensor CurrentInput 0
Position Controller MotorPositionController 0

API


Back Forward
Print this API

Code Samples


Example Options


Downloads

				Make your selections to display sample code.
					

Code Samples

Language:

APIDetailLanguageOS
DCMotor Visual Studio GUI C# Windows Download
DCMotor JavaScript Browser Download
DCMotor Objective-C macOS Download
DCMotor Swift macOS Download
DCMotor Swift iOS Download
DCMotor Visual Basic .NET Windows Download
DCMotor Max/MSP Multiple Download
Encoder Visual Studio GUI C# Windows Download
Encoder JavaScript Browser Download
Encoder Objective-C macOS Download
Encoder Swift macOS Download
Encoder Swift iOS Download
Encoder Visual Basic .NET Windows Download
Encoder Max/MSP Multiple Download
VoltageRatioInput Visual Studio GUI C# Windows Download
VoltageRatioInput Load Cell Calibrator C# Windows Download
VoltageRatioInput JavaScript Browser Download
VoltageRatioInput Objective-C macOS Download
VoltageRatioInput Swift macOS Download
VoltageRatioInput Swift iOS Download
VoltageRatioInput Visual Basic .NET Windows Download
VoltageRatioInput Max/MSP Multiple Download
TemperatureSensor Visual Studio GUI C# Windows Download
TemperatureSensor JavaScript Browser Download
TemperatureSensor Objective-C macOS Download
TemperatureSensor Swift macOS Download
TemperatureSensor Swift iOS Download
TemperatureSensor Visual Basic .NET Windows Download
TemperatureSensor Max/MSP Multiple Download
CurrentInput Visual Studio GUI C# Windows Download
CurrentInput JavaScript Browser Download
CurrentInput Objective-C macOS Download
CurrentInput Swift macOS Download
CurrentInput Swift iOS Download
CurrentInput Visual Basic .NET Windows Download
CurrentInput Max/MSP Multiple Download
MotorPositionController PID Tuner C# Windows Download
MotorPositionController JavaScript Browser Download
MotorPositionController Objective-C macOS Download
MotorPositionController Swift macOS Download
MotorPositionController Swift iOS Download
MotorPositionController Visual Basic .NET Windows Download
MotorPositionController Max/MSP Multiple Download

Have a look at our DC motor controllers:

Product Controller Properties Electrical Properties Board Properties
Part Number Price Number of Motor Ports Velocity Resolution Acceleration Resolution Continuous Motor Current Max Controlled By
DCC1003_0
2x DC Motor Phidget
$60.00 2 0.001 Duty Cycle 0.1 Duty Cycle/s (per motor) 4 A VINT
DCC1002_0
4A DC Motor Phidget
$40.00 1 0.001 Duty Cycle 0.1 Duty Cycle/s 4 A VINT
DCC1000_0
DC Motor Phidget
$75.00 1 0.001 Duty Cycle 1 Duty Cycle/s 25 A VINT
1065_1B
PhidgetMotorControl 1-Motor
$75.00 1 0.39 Duty Cycle 24.5 Duty Cycle/s 5 A USB (Mini-USB)
1064_1B
PhidgetMotorControl HC
$115.00 2 0.79 Duty Cycle 1.9 Duty Cycle/s (per motor) 14 A USB (Mini-USB)